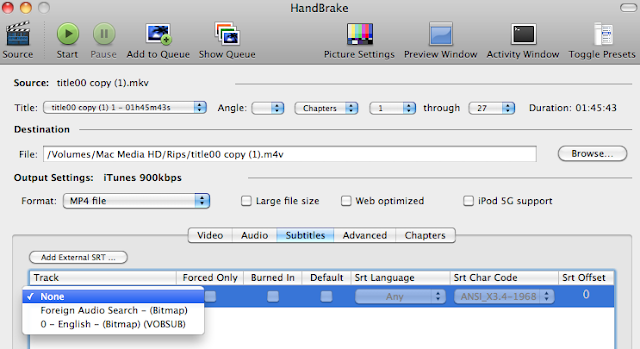
Handbrake (from version 0.9.9) will now burn subtitles direct from MKV containers ripped from Blu-Rays as the screen shot below shows:
But I've kept this post on, in case you are using an older version of Handbrake.
Also, for the record, BDSuptoSub can be run on OSX - but you need to install the OSX Java engine
------------------------------------------
In a previous post, I covered the method I use to rip DVDs and Blu Rays for use in iTunes and iOS products (check out the article here if you missed it).
To recap the tools I have:
- HandBrake (www.handbrake.fr)
- MetaX (www.kerstetter.net/)
- iTunes (which you have already on Mac OSX)
(BTW, Windows users, the following software all comes with Windows versions - so you should be fine to follow this summary described below.)
Often films contain "forced subtitles". These are for when a film in English language has dialogue spoken in a another language, and forced subtitles translate just these small sections rather than the whole film.
They are called "forced" because they play back as default on DVD and Blu Ray players. Trouble is getting them to do the same on your ripped copies.
As an example, the Lord Of The Rings trilogy of films have sections spoken in Elvish for which there are subtitles provided. This has been the catalyst for this investigation, as I really wanted those movies for my iPad.
The method described below also works for full subtitle tracks - especially useful for me for the Millenium trilogy of films where I like to have the original Swedish soundtrack, and have English subtitles.
Obviously, if you are hard of hearing, this is going to be of great interest too for all your Blu Ray ripping.
DVD
DVD is simple, and can easily be done in Handbrake. As you can see in the example below, this DVD of 101 Dalmatians has subtitle tracks recognised by Handbrake.
All you do is
- Select the right language
- Check the "Burned In" box
- Check the "Forced Only" if you want just forced subtitles, or leave it blank if you want all the dialogue subtitled.
That's it.
Blu Ray
Blu Ray is MUCH harder. This is because the Blu Ray format of subtitles are bitmaps, and as such, as not supported by many editing tools - Handbrake included. To witness The Lord Of The Rings in true HD glory and understand that Elvish dialogue, we are going to need to get some more software:
- MKVToolNix (http://www.bunkus.org/videotools/mkvtoolnix/) <- Shareware, but you can use it for free with a nag message.
- MKVTools (http://www.emmgunn.com/oldsoftware.html) <- The developer is busy updating this toolset, but you can do this with the old version still on the website.
- BDSupToSub (http://www.videohelp.com/tools/BDSup2Sub) <- Windows Only software
As an aside, this method may be long-winded, and there could be a simpler way to do it - I'm not perfect! So if there is, let me know! It took a lot of research through various forums....
OK, so we will assume you have a nice MKV file of your Blu Ray with all the audio and subtitle options on it that you need.
MKVTools
(1) Open MKVTools and open your MKV file.
(2) Navigate to the "Edit" Tab and choose the subtitle track you want to export (I know the Elvish to English translation for this Lord Of The Rings rip is Track 2). If you aren't sure, open the MKV is something like VLC Player and fiddle with turning on the different subtitle tracks until you find the one you want, then go back into MKVTools.
(3) Check the "Extract Selected Tracks" box on the right and click "OK". Another window will open and you will see the progress of the file extraction. It will store the subsequent SUP file in the same folder as you MKV file.
BDSupToSub
You will now need a Windows machine, or an emulator on your Mac running the BDSupToSub software.
I have searched high and low for a Mac native equivalent and draw a blank. Again, if you find one, let me know.
(1) Open BDSupToSub and load in your SUP file.
(2) Just leave the Conversion options as they are (the resolution should be 1920x1280 as this is the Blu Ray default).
(3) You will get a nice screen showing you the first subtitle line found. You don't need to do anything with this, just go into File / Save/Export and click OK (changing the language marker if needed).
You will have two files; a SUB file and a IDX file.
MKVToolNix
Back to the Mac environment now, and you need to open up the MKVToolNix tool.
(1) Click the "add" button to add your original MKV file and your new IDX file (make sure the SUB file is in the same folder or it will throw an error).
(2) Scroll down the "Tracks, chapters and tags" box until you see the VobSub entry at the bottom. This is your subtitle track. Check that box and uncheck all the other subtitles.
(3) Name the new MKV "Output filename" and hit the "Start muxing" button and wait patiently....
Handbrake
Now you have your new MKV, open it in Handbrake and check the subtitles tab - you should now see a VOBSUB file that Handbrake understands.
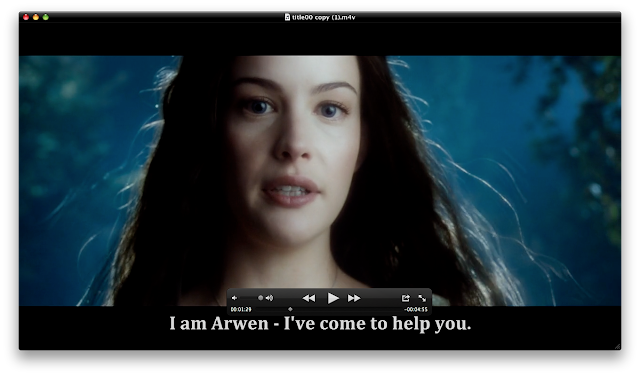
Set your options and off you go! Your output should look like this:
And there you have it.
Not too complex, just a lot of faffing about with different bits of software.
I'm sure paid for software does this out of the box. Actually, I'm not sure! It might not!


No comments:
Post a Comment